Setting up a File System backup using ZDB on 3Par is fairly simple, however there are a couple of challenges that you should be aware of, but we will address those later.
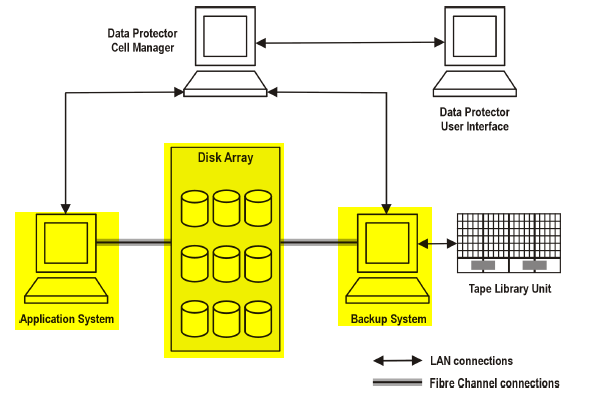
ZDB backups are made up of basically three machines:
- Your application server where the file system resides
- The backup system/server
- The 3Par array
These are noted in the figure below highlighted in yellow
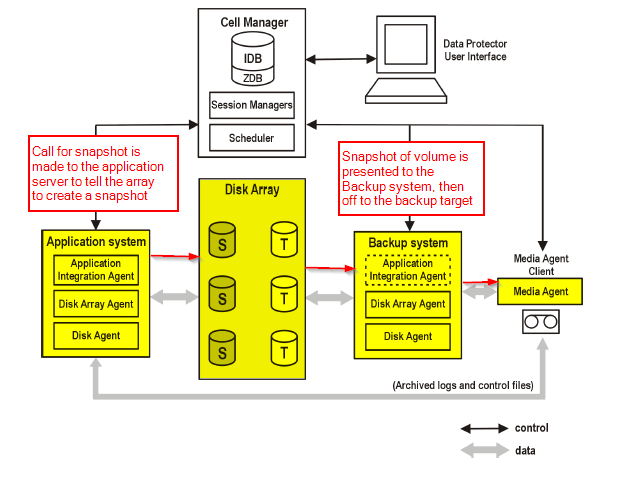
Once you have created the backup job (we will cover later) the command to have the array create the snapshot of the volume you wish to backup is made to the application server which then passes that command to the 3Par so the hardware array does the heavy lifting and it creates a snapshot on the array. At that point the snapshot is then presented to the Backup Server and mounted on the backup server so the data flows from the snapshot on the array to the backup server then off to your backup target. See figure below.
Now that you have an idea of how this works, let’s discuss what you need install on each component and what commands that you need to run. First you will need to install on the Application server and the Backup Server the following:
- HPE 3PAR VSS Agent
- HPE P6000 /HPE 3PAR SMI-S agent
- MS Volume Shadow Copy Integration
- Disk Agent
- Media Agent especially on the Backup System
Comment: The Application system and Backup system should NOT be the same server, also they both must be running the same OS.
How to setup the environment and commands to run to get the system ready
We have already discussed the components that need to be installed onto the Application system and the Backup system but now you need to verify that you have the hardware configured correctly to see the storage.
First you need to make sure that someone has configured a volume on the 3PAR and exported it to the application server and the application server can see its new file system and can read and write files to it.
Next you need to make sure that the Backup system has also been zoned into the 3PAR so it has connectivity to the array. It does not need to have the Application servers volume presented to it but will need to have the ability to at least “see” the array.
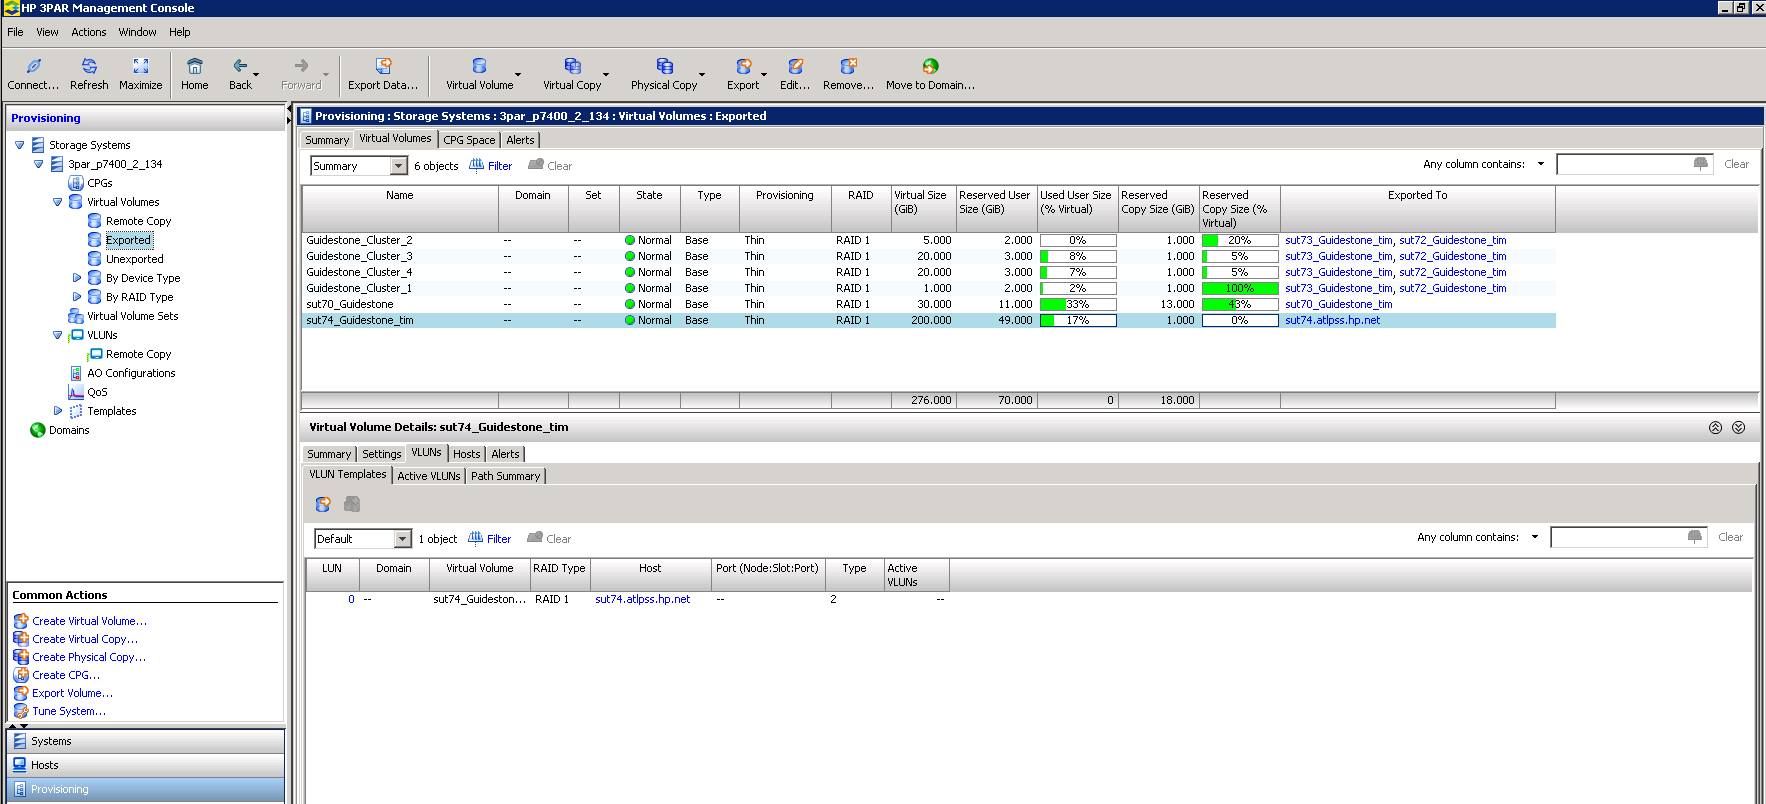
Now the trick here is that on the 3PAR array it works off the WWN of the host attaching to it and you can give the host name an alias of whatever you wish to call it, you create the volumes that you want/need to assign to the hosts attached to the 3PAR. The 3PAR will take care of the rest, when you export the volumes to the hosts. However, take note here when working with Data Protector the Backup System’s alias MUST be the FQDN of its self (see screen shot below).
As you can see from the screen shot below showing the host, if you look under the name at the highlighted one you can see that the name can be whatever naming convention you want to set up, again which is no problem. But if you look at the highlighted host in the second screen shot you will see that it is in FQDN form, this is the application server.
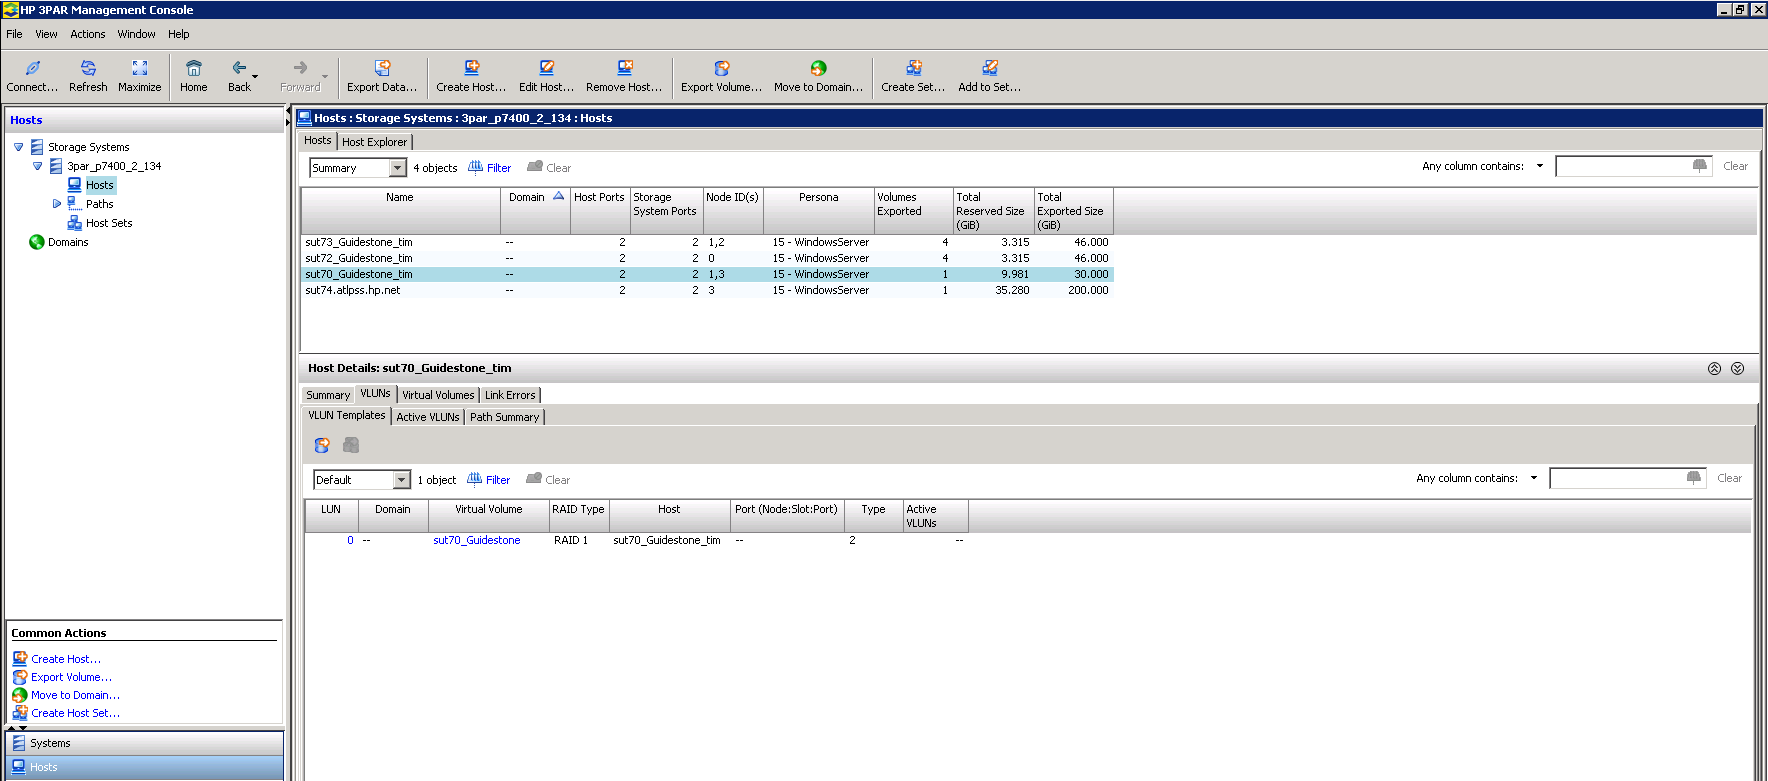
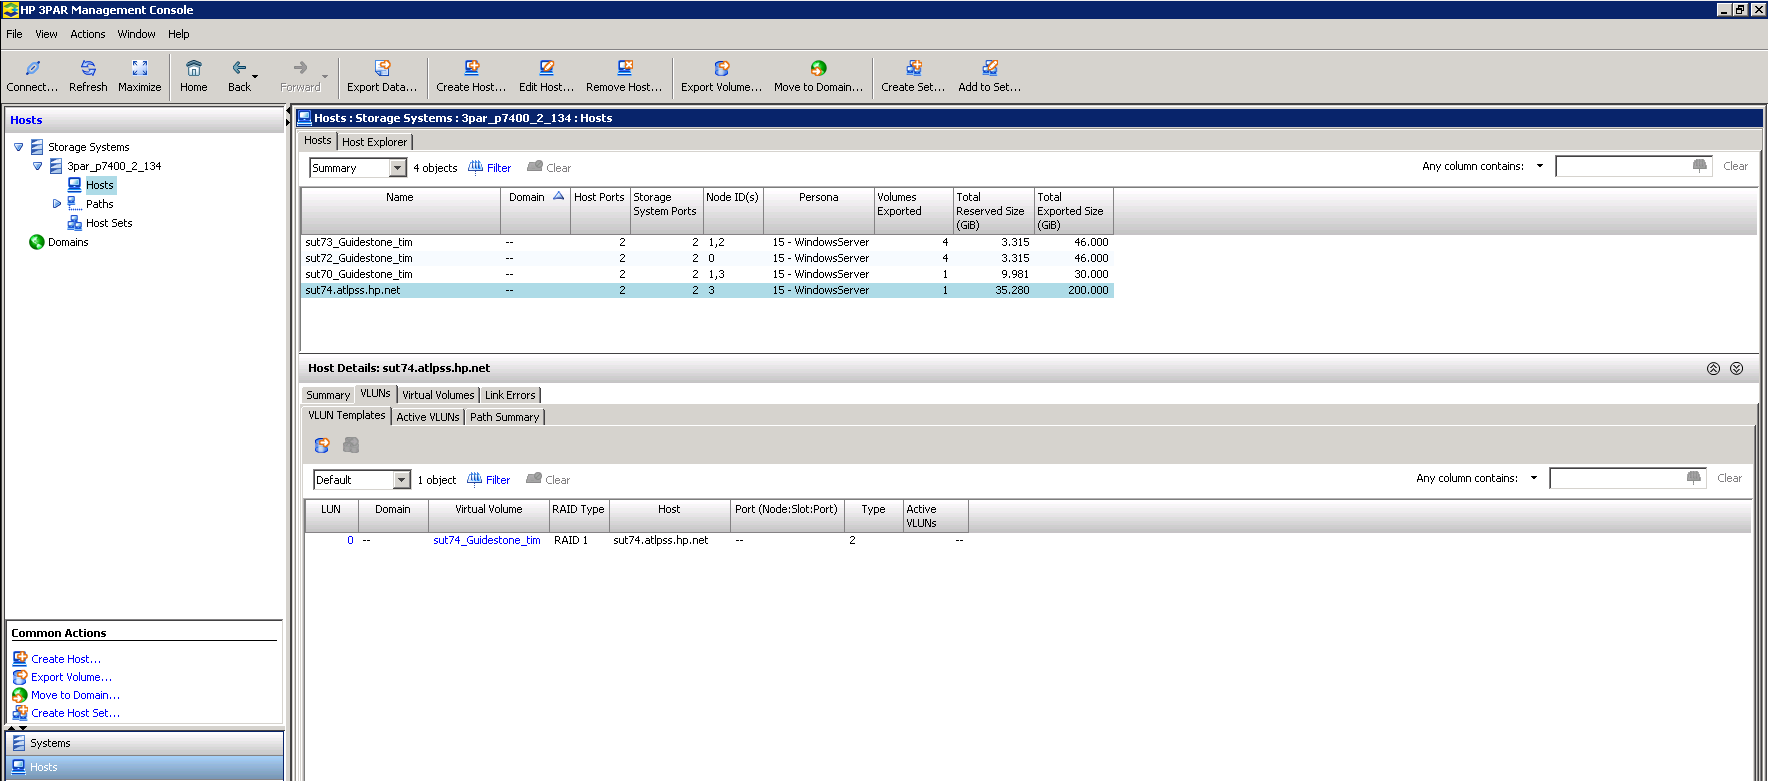
Now if you look at the screenshot below of the exported volumes which they can also be whatever naming convention you wish to use. If you look at the highlighted volume and look at the far right side of the screen you can see that it has been exported to the FQDN of the application server.
Now you may ask yourself why is it important for the application server to be required to be in FQDN form, well that is because when Data Protector ZDB is in action and it uses the application server it is trying to us the FQDN as it is defined in the client list of Data Protector, so if it is not defined in the 3PAR the same way. You will experience an error that will look somewhat like the error below. In the beginning (not shown) everything will look normal but then you will get the following error.
[Minor] From: SMISA@sut74.atlpss.hp.net "SMISA"  Time: 11/21/2015 4:29:55 AM
[236:9210] 	A SMI-S call to the array did not behave as expected.
		Failed volume:	DP-2015.11.20-10-056503991
		Returned message:	Error retrieving StorageID = HBA WWN of host sut74.atlpss.hp.net.

[Normal] From: SMISA@sut74.atlpss.hp.net "SMISA"  Time: 11/21/2015 4:29:55 AM
	Starting drive scan.

[Normal] From: SMISA@sut74.atlpss.hp.net "SMISA"  Time: 11/21/2015 4:30:26 AM
	Drive scan has completed.

[Major] From: SMISA@sut74.atlpss.hp.net "SMISA"  Time: 11/21/2015 4:30:26 AM
[236:51] 	Failed to resolve a storage volume on the host.
	Storage volume: DP-2015.11.20-10-056503991

[Critical] From: SMISA@sut74.atlpss.hp.net "SMISA"  Time: 11/21/2015 4:30:26 AM
	There are no valid objects left.

[Critical] From: SMISA@sut74.atlpss.hp.net "SMISA"  Time: 11/21/2015 4:30:26 AM
	Some or all storage volumes cannot be backed up. Session will abort.

[Critical] From: SMISA@sut74.atlpss.hp.net "SMISA"  Time: 11/21/2015 4:30:27 AM
	There are no valid objects left.

[Normal] From: SMISA@sut74.atlpss.hp.net "SMISA"  Time: 11/21/2015 4:30:27 AM
	The HPE P6000 EVA / HPE 3PAR SMI-S agent enabled
	automatic mounting of new volumes on the operating system.

[Minor] From: SMISA@sut74.atlpss.hp.net "SMISA"  Time: 11/21/2015 4:30:31 AM
	Preparation of the backup system failed.
What this is telling you is that it cannot find the host sut74.atlpss.hp.net which is our backup system in our example here in this write-up. This is why you MUST have the backup system listed is in FQDN form in the 3PAR.
Ok, now we have gotten through a few of the housekeeping steps and explained why they needed to be there we have just a couple of more things that we must do to finish this out so everything will work. The only thing left now is to tell Data Protector what 3PAR system to connect to, the userid has the proper permission’s and its password. We will be using two command to accomplish this.
The first command will be the omnidbsmis and the omnidbzdb and will give you examples of the syntax of each.
Our first command we will run is the omnidbsmis, this stores the login information for SMI-S of the storage array provider running on the management system. The syntax is:
omnidbsmis -ompasswd -add < ip address of storage array > -user < user name of SMI-S array Provider >
Example:
omnidbsmis -ompasswd -add 10.10.253.134 -user administrator
Administrator is typically the default user, names that are user accounts that are part of a domain should be entered in the format username@domain.
You can run the following command to verify what you added worked correctly (the output will look like the below):
omnidbsmis -ompasswd -list
     	 User               Host         Port   Ssl
---------------+--------------------+-----+-----
administrator@atlpss.hp.net (administrator@atlpss.hp.net) dp9.atlpss.hp.net     5988 No
administrator    sut64.atlpss.hp.net   5988 No
The next command you will run omnidbzdb and tells the system to execute the administrative task on the 3PAR array, and manages the configuration data of the agents used to connect to the CIMOM providers or to the storage system (this command is available on clients with the Data Protector User Interface installed, so just run it on the cell manager).
The syntax you will use looks like the following:
omnidbzdb --diskarray 3PAR --ompasswd --add < ip address of the storage array > --user < userid of userid with proper premissions > --passwd < password for that user >
Example:
omnidbzdb --diskarray 3PAR --ompasswd --add 10.10.253.134 --user 3paradm --passwd 3pardata
To verify you run the following command:
omnidbzdb --diskarray 3PAR --ompasswd --list
     	 User               Host         Port   Ssl
----------------+--------------------+-----+-----
3paradm          10.10.253.166        5988  No
Once that has been completed you are ready to configure your file system backup in Data Protector using VSS with the 3PAR array.
This post was prepared and documented by Geoff Rennie. Geoff is a Presales colleague in HPE Software – AMS region. Thanks for sharing this content.